
Ilga's Zig Zag Cowl
Some of you might be thinking of Christmas gifts you can knit up in a hurry. This is my “go-to” pattern if I need a quick item for a gift. For me, it’s about 8 to 9 hours from start through blocking, depending, of course on how long I end up making it. It works well with handspun or commerical yarn. This picture is of a cowl made in Crystal Palace Mendocino yarn (2 balls) that is 13 inches tall and (folded) 15 inches across.
I call this stitch pattern Zig Zag (though, there are lots of other things called zig zag.). This is a great stitch pattern for multicolored yarns as it shows off the color shifts and the color variation enhances the stitches rather than obscures them. This works very well with handspun yarns as well.
The basic stitch pattern is: I I I I ^ I I I I 0 I 0
Key: I = knit stitch, 0 = yarn over and ^ = Center Double Decrease
It’s 12 stitches to a repeat, so just repeat this as many times as you want for the size you want. The one shown is 13 repeats using a worsted weight yarn (4 to 5 stitches per inch). I’ve used some sock yarns (7 to 8 stitches per inch) and made up to 18 repeats. It all depends on how slouchy you like your cowls.
Each pattern row is followed by a knit row, if you are knitting in the round. OR, if you want to make a scarf that is flat, each non-pattern row is purled. If you are working in the round, as in a cowl, you do NOT need to balance the pattern. If you are knitting flat, as in a scarf, then you do.
You can also easily change the number of knit stitches in the blocks if it looks better with your yarn. For finer yarns, I’ve used SIX, for example: IIIIII^IIIIII 0I0
See what looks best with your yarn. Caveat: I do find that THREE is too small to show off the pattern as well, but that’s just my opinion. Also, this is an easy pattern to fix if your count goes off. This happens especially if you start and stop your rounds on the exact same stitch. I’m lazy about using stitch markers and just watch when the end of the row comes into view. It’s an easy fix, so I don’t do a lot of ‘tinking.’ Just make a stitch (knit into the stitch BELOW the one you just knit) if you are missing one. Do this just next to the CDD. If you have an extra stitch, just do a ‘knit two together’ next to the CDD.
NOTE: This pattern really does want to curl, so add a few garter rows at the beginning (first few rows) and end (last few rows). The zig-zag happens automatically. When you block it, just follow those zigs and zags and they hold very well.

Cynthia modeling the cowl.
How to make a Center Double Decrease: http://www.youtube.com/watch?v=Wi5JpkOoLCI
This post first appeared on Ilga's garden blog on July 19, 2012.
Ilga is sometimes asked how she achieves her high spinning productivity. Here are some tips.
Well, first, I spin every day…or pretty close. If I am FLYING somewhere, I don’t take a spinning wheel…but if I am DRIVING and will be gone overnight, I generally have a wheel with me.
The other BIG productivity help is that I do NOT inch-worm spin. When I used to teach (decades ago), I really discouraged people of spinning that way. It is slow and it can never BE fast because of the actions required. I draw against the pull of the wheel…and not against my hands (which saves my hands, too). I used to long draw, but the body parts (as in shoulders) don’t want to do that any longer.
Depending on what I am spinning, I spin between 200 and 400 yards an hour, average 350ish. I approached the “production speed” problem by doing what my typing teacher in high school (Yup, my parents made me….that “just in case” stuff.) which was that I spend a few days every other week or so alternating between spinning for accuracy and for speed. So one skein is SUPER FAST, the next one SUPER ACCURATE…and I do that for three or four days. It usually improves BOTH speed and accuracy.
If a skein is too much, try an hour (or half an hour or 15 minutes) of spinning as fast as you can while still making a functional yarn. (Use some stash wool you don’t LOVE anyway….and don’t worry about how it turns out. This is about PROCESS, not product!) THEN, do an hour of PERFECT yarn. Then FAST, then PERFECT. Repeat. You will be surprised how quickly both of them improve.
We’ve had a festive week! Mike’s mother (who lives here at Edgewood Garden) was 96 years old last Thursday. To help celebrate, his sister, Bea, and her daughters (lovely 27 year old twins) were here for a few days, so I have been a bit lax about my fiber endeavors. They just left and I have finished the dishes and Mike is listing yarns and braids in the shop, so I thought I might write a little bit here.
I knit a scarf for Bea which I gave to her on Wednesday when she arrived. In the process of making it, I discovered something interesting. I had dyed some Mulberry silk 50% NZ wool 50% yarn in denim blue and grey. After a few samples with the yarn, it revealed that it was very slippery on the needles. I decided on wooden ones to help with that. It’s a basic large leaf pattern, so not challenging, but with Mike and Jeanne’s recent dental appointments, it was a good waiting room project. Near the end of the scarf last week, I snapped the tip off of one of the wooden needles. I grabbed another pair of No. 2 needles, this time, coated aluminum to finish the last foot or so of the scarf. The odd thing was that I ended up knitting much more loosely on the metal needles than I had with the wooden ones. Curious. Fortunately, the difference was pretty well hidden by the blocking of the scarf.

Until last week, I had never changed needle material during a knitting project, so it was a revelation to me that I knit so differently on wood and metal. It turns out that the metal needles encouraged me to knit even looser than I usually knit. Learn something every day!
This post first appeared on Ilga's garden blog on September 14, 2013.
Update: we have posted a brief video on YouTube that demonstrates the drawing technique Ilga discusses here. You can find the video here.
Since Spinzilla is coming up, I thought I would talk about spinning for speed. (You might also want to read my other article about my “exercises” in spinning for speed and accuracy: Tips for Fast Spinning.
One of the forms of spinning that has become popular is the “inch-worm” or sometimes called the “worsted” method. The spinner holds the wool “package” (be it locks, rolag, roving, or tops) in the back hand (or hand furthest from the wheel), and uses the front hand to pull out the draft area and push the fiber towards the wheel. This can produce a very even and accurate yarn, especially for beginners, however, at a cost. The main cost is speed of spinning. There is a functional limit to how quickly you can perform this operation.
(NOTE: Though this is called “worsted method” it does not necessarily mean that the spinner is making worsted yarn. A worsted yarn is a yarn in which the fibers enter the spin parallel to the yarn. A woolen yarn is one in which the fibers enter the spin perpendicular to the yarn (from a rolag) or somewhat more randomly from carded roving. The “worsted” spinning method was used (and got its name) with very long stapled wool, when spinning from the lock. In that case, the fibers of the lock were fanned out and entered the spin from the tips (i.e. parallel). Now that people use this spinning method for many different fiber packages (rolags and carded roving) which do NOT produce a worsted yarn.)
An alternative spinning method is to have the back hand draw the wool. If the spinner tightens the brake so that the pull of the wheel is enough to draft the yarn (this also happens when there is a wide variance between the bobbin and drive whorls of a double banded wheel), then the hand holding the wool package is the one which is pulling out the draft area against the pull of the wheel. The other hand need not be involved at all as in the case of drawing from a rolag. This is called a “long-draw” which is essentially spinning with one hand. Or, if spinning combed tops or roving, or other more “slippery” fiber formats, then the front hand “holds back” the spin and slides (gently, no death grips here) along with the draw. In this case, both hands stay ABOUT the same distance apart during the draw and during the release into that strong pull of the wheel. Both hands move back and forth from the fully extended draw to the release onto the bobbin. This is called “woolen” spinning.
(NOTE: Again, the same thing holds true…the method does not necessarily produce a “woolen yarn” unless the fibers are perpendicular or random. Spinning a combed tops this way will NOT produce a woolen yarn, since the fibers are entering the yarn parallel to the length of the yarn.)

Demonstrating drawing back from the wheel

Releasing spun yarn back into the wheel
The back hand is pulling the wool away from the wheel and controlling the amount of wool that will be in the yarn. Your hand must be loose, so the wool in the roving, tops, rolag or whatever, can always be available to the draw area between your hands. Note that the spinning activity actually takes place some distance from the orifice of the wheel. This introduces another advantage: you can pull out VM, unwanted slubs of fiber, or other debris BEFORE it hits the spun yarn.
The big advantage to this form of spinning is production speed. The big disadvantage is that it takes more practice to perfect the technique and spin an even yarn. Here are some pictures taken at intervals to show what is possible in terms of production.

Five minutes of spinning
I’m spinning on my Lendrum Saxony with Scotch tension on the smallest of the standard whorls, an 18 ratio (which is about the same as my CPW). This is a 6 ounce bobbin. I should have moved the last hook before I built up so much yarn that it toppled, but I wanted to show the shaft size.

Ten minutes of spinning
Another 5 minutes of spinning and I am filling up the second level of the bobbin. This is a 75% BFL/25% silk handpainting combed roving/tops.

Twenty minutes of spinning
At 20 minutes, one ounce of fiber is spun into about 200 yards. (This will be part of a two skein set.) The average spinning speed is 600 yards an hour--- IF this speed were sustained. Do I spin at this speed all the time? NO, not at all. (I’m usually spinning at about 400 yards an hour which is very sustainable even while watching a movie.) This is just to show you what CAN be done with this technique of spinning. This with the alternating exercises of spinning for speed and spinning for accuracy can improve your yarn production in both ways!
This post first appeared on Ilga's garden blog on March 18, 2012.
Recently, I’ve had several people ask me about how I dye. Some just want to know for curiosity’s sake and others to learn how to do it themselves. These photos were taken about six months ago and posted on my Edgewood Garden Studio Facebook site to show a knitter’s customer how the wool for his daughter’s gift (a beautiful cowl) was processed. Here are the pictures again, with some more commentary so that you can learn more about the process.
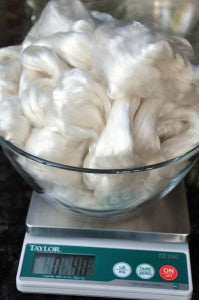
Weighing out the wool
The first thing that I do is weigh the wool roving. In this case, it is merino-silk which has a lovely sheen. I generally weigh 4 oz. pieces, as most spinning wheel bobbins will accommodate 2 ounces of wool, and I generally spin 2-py yarns in 4 ounce skeins.

Soaking before dyeing
Next I fill a container with lukewarm water. I carefully put the roving into the water, gently pushing it down. If I find I need to add water, I straddle one hand over the wool and pour the water on my hand rather than directly onto the existing water/wool. This prevents agitation which could felt the wool. The wool should soak approximately 20 minutes to half an hour at the minimum. Not to worry if you don’t get back to it in time, it can stay there for hours with no harm done. (There are stories of ships with bales of wool that were sunk for decades. When the wool was retrieved, it was still intact after the salt water was washed out.)
A bit about felting. Wool, looked at under a microscope, looks vaguely like a pine cone, with spiral scales with little hooks on the ends. These scales open out when they are wet and/or warm. If you agitate the wool at this point, the little hooks get impenetrably tangled and you have made felt. A wonderful property of wool, but not what we want to do during the dyeing process!

The work counter
This is a picture of a very pristine work counter. In reality, it is generally MUCH messier. To be honest, this is staged for nice pictures. Do not rely on just newspaper to protect your workspace. I put overlapping layers of plastic wrap under the newspaper for some REAL protection. Since taking this picture, I have made a change in terms of gloves. The normal dishwashing gloves are a little “sticky” (to help hold soapy, slippery surfaces) and tend to “pull” on the surface of the wool. If you can get some nitrile gloves (sold in auto parts stores and some drug stores), they are the best for dyeing. Vinyl and latex gloves allow dyes to bleed through, so don’t rely on them to keep you from having colorful fingers! When dealing with powdered dyes, do wear a dust mask. The very fine dust is toxic.

A selection of dyes
I mix my dyes (Jacquard, Pro Chem and Dharma Trading company ACID DYES) with boiling water in quart canning jars. It’s about 2/3rds hot water to dissolve the dyes and about 1/3 vinegar to provide the acidity required. Don’t overdo the vinegar, as too much makes the dyes fail to take on the wool. When the diluted dyes are cooled, we (my husband Mike is my ‘dye master’) transfer them to plastic squeeze bottles. Be sure to label your jars and bottles. One blue or green can look very much like any another blue or green when it’s just a dark liquid in a bottle.

Roving laid out for dyeing
When my dyes are mixed and in their squeeze bottles, I lay out a few overlapping sheets of plastic wrap on my work table. Then, I gently remove the wool from the soaking bowl by sliding my hands under the wool to lift up and out. Squeeze (do NOT wring) excess water out of the roving. I like to press it against the front side of a sink. Lay the roving out in zigzag on the plastic wrap. I generally lay them out in about two foot+ widths. By doing the zigzag, you ensure that there are reasonable repeats in your yarn and you don’t end up with a yarn that is one color at one end of the skein and another at the other.

Dyed roving on the table
Finally, it’s time to apply the dye to the wool. I use the squeeze bottle to run stripes about two inches in width, give or take, across the wool. Since I like the interaction of colors, I am not particularly concerned about segregating the colors, and so I allow for overlap. Since I spin worsted and finer, I do 2- to 3-inch color sections. If you want longer sections of color, adjust the width of the color on your roving. Remember, unlike dying YARN, these sections will be stretched out and the colors will blend a bit at the intersections in the spinning process as well.
Given that this example is all in one yellow-gold tone, it doesn’t show the wonderful interactions that the colors can have in a roving. Experimentation is the best teacher! I keep a couple of extra squeeze bottles for custom mixing of the liquid dyes “on the fly.” My full dye selection is about 45 different colors, but often, I have a hankering for something that does not come pre-mixed. That’s when “a little of this and a little of that” comes into play. Be sure you mix ENOUGH of your custom color as you will likely not get the exact same mix again.

Roving wrapped in plastic
Be generous with plastic wrap before you lay out the wool, as you will need to fold the sides over your dyed wool.

Rolled and ready for steaming
After I have folded over the sides of the plastic, I take the whole thing from the end and roll it up like a sleeping bag. This is what the “package” looks like when it is ready for steaming.

In the pot
We use a gigantic stainless steel steam pot that I found on Ebay (made in Turkey), but you can use an enameled canning pot, too. Do not use a “reactive” pot and remember, NOTHING that is used in the dye process should EVER be used for food again. Inside the pot, we put a couple of inches of water, and the wool package rests in a large colander to keep it out of the water. Remember, the dyes are water soluble UNTIL they have been heat set! You want the hot steam to set the dyes, not dilute them in the boiling water! (Can you hear the voice of experience speaking here?) Be sure you have good ventilation. The fumes are unpleasant. Be careful.
When this photo was taken, we were steaming on the gas cooktop inside the studio. These days we use propane burners outside on the patio. which eliminates the problems with fumes.Our climate is such that we can do this all year round, but that won't work for everyone.

Wool package after steaming
After 45-60 minutes, you can take out the steamed package. (Either dump it or use tongs---it’s HOT.) The plastic has become a little cocoon for the roving. Now, I KNOW that you want to see it immediately, but trust me, you want to LET IT COOL! Steam burns are really unpleasant (ask me how I know) and can put you out of commission for some time. I repeat, be patient: LET IT COOL. We generally let things cool overnight before rinsing them.

Released from package
When you open it up, the water that escapes should be nearly clear. I use four bins filled with lukewarm water (about the temperature of the wool at this point) and dunk the wool into each one successively, squeezing against the front of the sink in between each dunking. Do all this GENTLY. You don’t want to felt the wool at any point…and this is the easiest place to do it. When the water runs clear and the vinegar smell is gone, your yarn is ready for the last squeeze.

Hanging to dry
After squeezing against the sink, I fold the roving over two or three times and lay it on an old lengthwise-folded towel on the floor (Goodwill, Salvation Army and the like are good sources for old towels if you don’t have any on hand). Fold the towel again, lengthwise, so you have a long thin towel on the floor. Stomp on it. Don’t do the twist, just walk down the towel so that you have squeeze the wool thoroughly in its little towel encasement. Roll up the towel like a sleeping bag and let it sit for about 15 minutes. You will be surprised how much moisture comes out of the wool into the rolled towel in that time. Open the towel and hang the roving to dry. The colors will get lighter with the drying process.
Another option is a small spin dryer. These are an alternative to the washing machine spin cycle that operate by spinning the contents at high speed to fling the water out. They can be purchased online for about $125, and are worthwhile if you dye regularly.

Braided rovings
For this particular yarn, I used three fibers: kid mohair, merino-silk, and 100% tussah silk….

Knitted sample
….to produce a very soft yarn with a slight halo and subtle gradations of sunshine yellow.
I hope this helps you understand the process I use for dyeing roving (and sliver). Remember, this is just one technique and there are other ways to add beautiful colors to you wool. Experiment and try different methods and see what works best for you. If you have any questions, please don’t hesitate to contact me here or Ravelry (I’m GSD-Mom there.)


